Okay, today we’re going to be talking about the nasal fiberoptic intubation. First, let’s talk about the when and the why. Typically, when we talk about this, we’re talking about an awake fiberoptic and we’re doing this in a person with a compromised airway who has a little bit of time until they fully decompensate. This is different than the patient that needs RSI and airway securement right away. This is ideal for the patient with Ludwig’s angina or angioedema, who needs an airway, and we’re trying to save ourselves from doing a cricothyrotomy in somebody who would have a very difficult oral tracheal intubation.
Okay, so now that we have our patient in mind, let’s talk about our equipment. To do an awake, nasal fiberoptic intubation, you don’t need much. You need a video fiberoptic scope and the materials to topicalize the patient. We do not want to trivialize this procedure, it can be challenging to do in real time, but the materials necessary to complete it are relatively easy to obtain. Let’s first take a look at our video nasal fiberoptic scope. Here we have the AMBU system for single use fiber optics. We have no relationship with this company. This is what we have for demonstration. It comes in three sizes: The orange is the large, the green is a medium, and the gray is a small.
Choosing the right size for the patient and indication is important because they all have different outer diameters and handle different size endotracheal tubes. The very thin gray is great as an alternative to an NPL if you’re just trying to take a look through the nose, looking for burned airway, area edema, the size of the epiglottis, et cetera. And most manufacturers will have a card like this one provided by AMBU that shows the ID and OD for each tube size, as well as the smallest endotracheal tube that can fit on the fiberoptic scope. Selecting the right scope and tube size for the patient is obviously very important and it is a balance, right? A balance between having a larger scope and tube, which will make ventilating and managing the patient on the vent easier afterward, but will make it more difficult to get through the nare. Here’s the orange large AMBU scope taken out of his packaging. It has a sheath protecting the fiberoptic device itself, and a single plug which plugs right into the monitor. And looking at the operator handle of this device, we have our control lever here. We have a working channel where we can instill more local anesthetic and we have this side port that connects to suction and a button on the opposite side of the device that can control that suction. I like to use my thumb on the working lever. Other people will use their index finger and have the device facing the other direction.
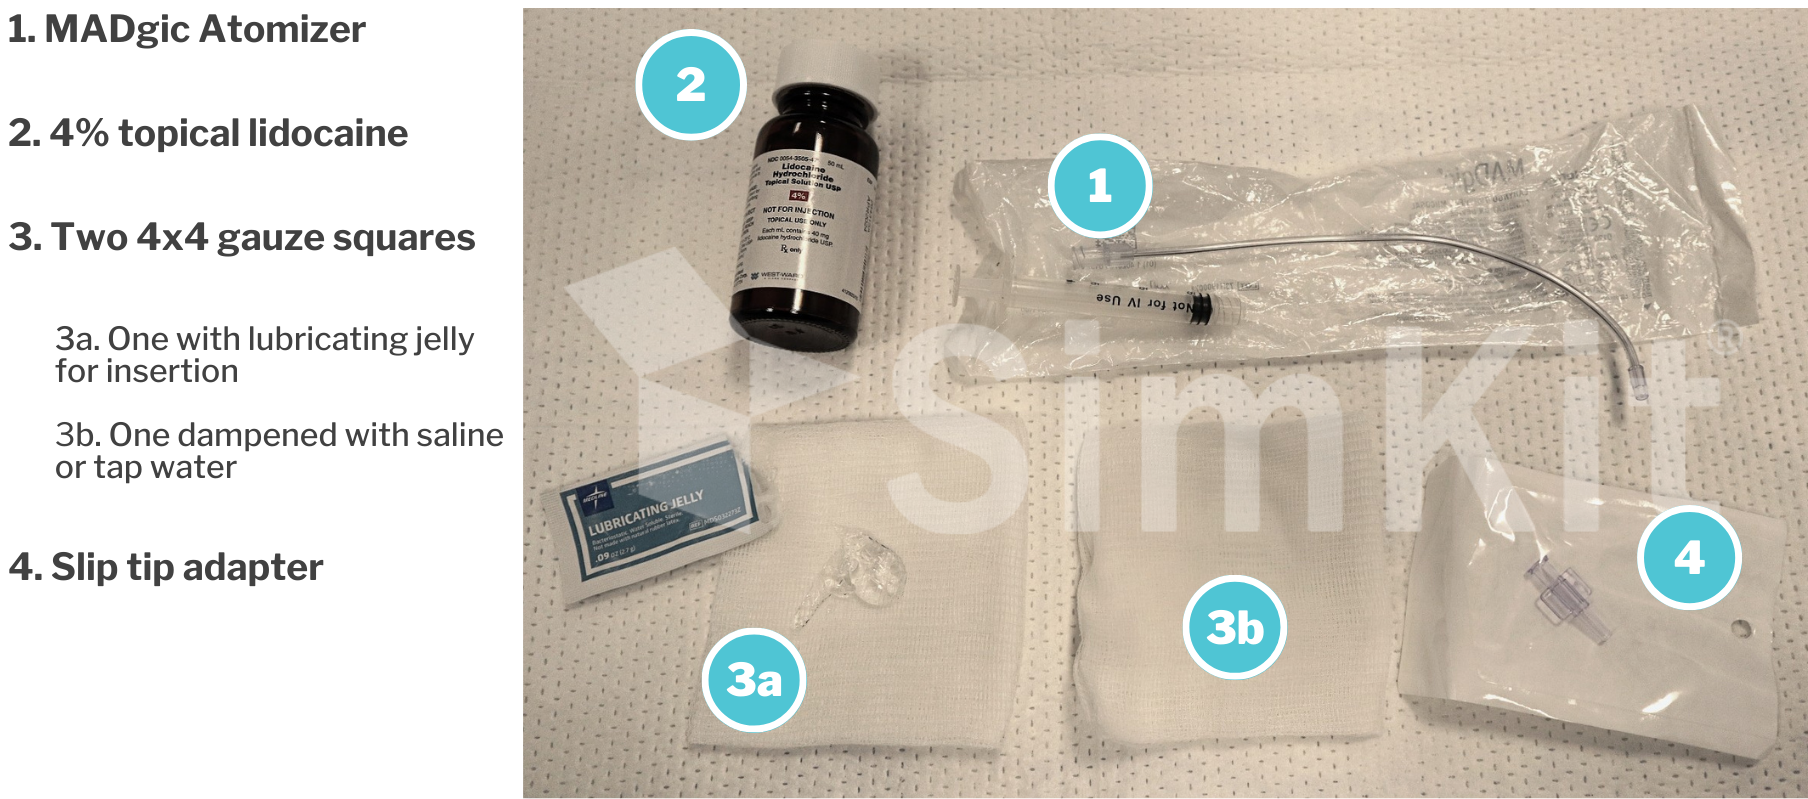
Okay, now that we’re familiar with our scope, let’s talk about prepping our patient. The materials necessary for topicalization are nearly ubiquitous in an emergency department, with the exception of one. This right here, which is the magic atomizer which is highly recommended. It is an extended neck with a piece of metal in it, which allows it to be semi rigid but manipulable. The tip is the atomizing element and it comes with a small volume syringe which I will usually swap out for a 5CC. The next important agent is our 4% topical lidocaine that we use to anesthetize. And then we also recommend 4×4, one with lubricating jelly for insertion and one dampened with either saline or tap water. Finally, we have the slip tip adapter which will go into the end of our working channel for our AMBU scope.
Alright, now that we have an understanding of the scope and our elements needed for topicalized the patient, let’s walk through the procedure itself. So here we have our beautiful model and volunteer ready to be topicalized and nasal fiberoptic intubated. The first thing we’re going to do is take the end of our scope and simply plug it into our video monitor. We’re going to assess the scope itself to make sure that it’s working properly, flexing and extending as needed. And then if able, ask the patient to try to breathe through each nostril to see which one has better patency and air flow. That is the one we’re going to be topicalized. We then take our magic atomizer, which has been prepped with our 4% topical lidocaine, insert it into the nare and atomize as we exit. Small quantities of the 4% will trickle from the narrow down into the hypopharynx and ask for the patient to allow that to sit in their hypopharynx for a period of time before spitting it out or swallowing. Adequate and full anesthesia is vitally important to the success of the procedure, so be liberal with the use of the lidocaine. Again, it is being applied topically. It’s systemic absorption is low and the risk for toxicity is also very low. I will usually topicalize at least two, preferably three times, to try to get good anesthesia and want to pay attention to the very anterior point in the nare, which is often overlooked in an area of discomfort for the patient, if not specifically atomized. Once we are done with the magic atomizer, we will switch to the slip tip adapter, which will go on to the working channel of our scope. As you’ll see in a moment, this working channel is not an atomizer. It really is just squirting down the lidocaine itself. But it is vitally important to anesthetize the cords prior to passing the tube. We can now use our lubricating jelly to lubricate the scope itself and use these saline soaked gauze to clean the camera if needed.
Alright, we are now ready to pass our scope. Remember that we enter into the nare inferiorly, but we really want the scope perpendicular to the face to get through the nasal cavity and into the nasopharynx. As you’ll see here, there’s often a need to rotate the scope to avoid the turbinates and get into that nasopharynx area. If the patient is experiencing discomfort during this time frame, it usually means that we have not adequately anesthetized the anterior aspect of the nose and the terminates, and if needed, we can go back with our magic atomizer. After we get into the nasopharynx, it’s a pretty easy shot down into the oropharynx and to our area of target, which is the hypopharynx. As you can see here, we’re definitely making progress, as that epiglottis comes into view. We continue to work our way down past the epiglottis until we can get to the retinoids and chords in the hypopharynx. As we work our way down, the patient may need to swallow, which very briefly will obstruct our view. But these cameras are made to be anti fog and rarely, if ever, will this affect our view on the screen. As we approach the retinoids, this is another important time for topicalization. We can use our working channel and our 4% lidocaine to anesthetize the vocal cords themselves.
The patient very likely will cough choke possibly swallow which will obstruct our view again just momentarily after which we’re ready to pass the two. And just to give you some more exposure to this, we decided to switch roles. So I will now be your patient. And unfortunately, I’ve had a bad run of it with my lisinopril and have some horrible angioedema. As we did our first time, the practitioner is going to start by plugging the scope into the video screen. We are going to check the nare patency and decide which nare we’re going to enter from. And our provider graciously is explaining the process of topicalization and entry into the nare with the atomizer. We are again going to be rather liberal with our use of this topical anesthetic to try to get good anesthesia for the patient. As we do this, we are often going to be using much more than 1 ML of liquid, which we all know is the quantity that a nare can handle. A lot of this liquid is going to go backward into the hypopharynx and again we asked the patient to allow it to sit there before spitting or swallowing. Now, depending on the patient’s disease process and anatomy, entry into the mouth to anesthetize the oropharynx and hypopharynx is also an option. In the interest of brevity, we skipped over the second and third round of local anesthetic into the nare and are jumping right into the scope. First, the practitioner is going to verify the proper functionality of the flexion and extension of the scope tip. Before lubricating it, verifying cleanliness of the camera and inserting it into the patients nare. You will again notice some difficulty with passing by the terminates, which can be avoided by staying along the septum and again highlights the importance of anesthesia in this area. Here you see the practitioner finds the easiest passage of the scope through the nasal cavity by staying inferior and toward the septum. The scope has now gained passage into the nasopharynx, which has a pretty straight shot down into the oropharynx and toward the hypopharynx. And justice to highlight the accessibility of this procedure to the emergency physician, this practitioner has not done this procedure in an actual patient and has done it on our simulation mannequins. He’s being very ginger and gentle in his passage down to the hypopharynx, which I appreciate as this patient. He’s now getting down to that sweet spot of my epiglottis and my vocal cords. This, again, is an area where we are going to be using our active channel to send some more topical anesthetic over the chords to anesthetize them. As we approach that critical time of tube passage, practice patterns and recommendations are going to vary. Liberal use of local anesthetic is certainly important, but many will recommend some type of anxiolysis or analgesic. I personally think ketamine is a fantastic agent for this to prep the patient for the passage of the tube through the vocal cords. To direct the scope exactly where you want to go requires a combination of clockwise/counterclockwise rotation and use of the control lever to flex and extend the scope. A combination of these two maneuvers will get the scope in the ideal position. So as my colleague preps to send this scope through my vocal cords, let’s do a little wrap up. The nasal fiberoptic intubation is ideal for the patient with an impending airway compromise, who would have an difficult oral tracheal intubation, something like Ludwig’s angina. We’re going to be familiar with our scope. We’re going to use 4% topical lidocaine and an atomizing agent like the Magic atomizer. We’re going to atomize liberally and as we approach the chords, we want to anesthetize that area as well. At this time, it’s often ideal to use an anxiolytic and or analgesic agent like small clots of ketamine to make passage of the tube much more comfortable for the patient. Most importantly, this procedure is definitely within the wheelhouse of the emergency physician, so familiarity with it is very important!