Just Do What I Do: Teaching Procedures to Medical Professionals
Contributors: Jason Hine MD
In the fast-paced environment of medical practice, teaching procedures is a crucial skill that extends beyond simple knowledge transfer. In this podcast we delve into the intricacies of educating medical professionals on procedural skills, emphasizing the importance of structured methodologies for effective learning.
Transcript
Hi guys. This is Dr. Hine again for the Sim Kit Podcast, talking about a topic that is so, so near and dear to my heart. It’s just do what I do. It’s teaching procedures to medical professionals. Now we at Sim Kit, we teach procedures all day, every day, but we don’t really talk about how to teach procedures.
Now, whether you are a, an attending who’s responsible for onboarding new attendings or remediation when there’s a bad outcome. If you’re teaching medical students or residents or apps, many of us are teaching procedures to ourselves, to our colleagues. To other staff members. And so knowing how to do this, even if you’re not a medical educator, is such a valuable skill that it’s worth just having a conversation about.
And many of the times what happens if we don’t prepare, if we don’t do these types of learnings or thinking about things beforehand, we just say to someone, I’m really good at reducing shoulders. Just do what I do. Watch me do this central line. That can work if you’re, you know, quite good at it and the patient and the provider that you’re teaching are all in the right space.
But this is fraught with a lot of errors and it’s particularly more challenging when we’re working in a higher acuity or harder to execute procedure. That would be like someone just saying, here, I’m Michael Jordan, just play basketball the way I play basketball. Do this dunk the same way that I do. Jump, you know, 10 feet high, 15 feet far, et cetera.
Interestingly, I did not notice this until making this pa this post, but this is an edited image. This super famous image looks like it’s been manipulated. I don’t know if he’s actually further away or closer to the basket than in actuality, but this iconic image isn’t right. Look at the clock. Is there twice this.
Spectators are morphing into other people. So I don’t know the true story behind this image. If anyone does, please let us know. But yeah, if someone asks me to do this type of move, no, I can’t do it. I can’t do it without setting up a structure, without teaching me the framework. And to be honest, at five foot six, I probably couldn’t do it anyway.
But for medical procedures, we can’t just say do what I do. We need to give people a framework. We need to give them a safe practice environment. And that’s kind of what we’re gonna get into today. So our objectives for this talk are we are going to explain how people learn new mechanical skills. We’re gonna understand the basics of that.
Then we’re gonna figure out how we optimize the safety and uh, efficiency of teaching skill instruction. We’re gonna apply several different practical frameworks for teaching procedures, and in the end you get to kind of pick which one’s your favorite, and then we’re gonna outline how to deliver high quality performance feedback for people who are learning procedures.
So teaching procedures is unique, right? This is unique compared to, say, a knowledge acquisition or teaching someone a knowledge base skill. Because of several things. Of course, yes, there is knowledge involved, but there’s more than that. There’s a psychomotor skill component and there’s actually real time decision making incorporation of visual, tactile audio feedback and things that are happening with the procedure, the patient’s response to it, how we’re doing with it, that need to be taught and mastered, which is just very different than learning a specific antidote or how to interpret an EKG.
The stakes here are very high. They’re high stakes because we have to consider and balance patient safety. There’s gonna be learner anxiety, and then we as as instructors, have responsibilities for all of that, which really ups the ante when it comes to teaching procedures, particularly in the clinical environment.
And then there’s a huge degree of variability. Now, we know with learners, there’s degrees of variability about knowledge base. When we’re talking about knowledge translation. Learners differ widely in their experience and exposure to a procedure. Their confidence, their aptitude and dexterity, and that high variability can make things really challenging as well.
So our goal here is just to balance supervision, autonomy, and safety. That’s what we’re trying to do. We’re trying to create a nice balance between supervision, autonomy, and safety. So. A little bit of medical theory and educational literature here. There are stages of skills acquisition, and there are three, I’ve added one, but we want to kind of break this down and think about how people learn mechanical skills.
So the first one is the cognitive stage. The learner basically understands the steps of the procedure itself after they build this foundation or build the track on which they’re gonna run. Then we have our associative phase. The learner gets to practice the procedure with coaching. They get to drive the bus or drive the train in our analogy.
And then the third stage is this autonomous stage where the performance by the learner becomes fluid. They start to get skill. They have their aha moment, you know, reference our prior discussion about learning curves. But people start to get better and smoother with time during that autonomous stage.
And then I added, of course, you know, I’m big on cognitive science and keeping skills up. There’s the maintenance stage. We all have to periodically revisit procedures to make sure we’re staying sharp in them. So before we go further into some of our frameworks, let’s just take a quick pause and recognize McCluskey.
So McCluskey has the theory of margin, and really what we wanna recognize here is that. Not every procedure and not every time is the right time to teach. McCluskey got into the idea of load versus power, and I think about this like an electrical circuit load is the resistance, power is the amps of the battery.
Load are things that are negatives. They’re, they’re keeping us from being in a place where we can learn properly. There’s external pressures like family wear, community, internal like aspirations, desires, imp, impress your attending, impress your colleague, personal goals of getting, you know, the right sub-I, et cetera, et cetera.
And then powers the opposite. Powers are things that allow us to learn. They are also external or internal. We got family support, we got work flexibility, we got supportive work environment, and then internal, right resiliency, feeling healthy, having a lot of internal motivation to nail this procedure. And most importantly, what we’re saying here is sometimes the load is gonna be way more than the power, and that is not the time to teach a procedure when the power outweighs the load.
That is the time to teach. Alright, so with that in mind, let’s think about, or talk about how we set up our learning environment. First, we’re gonna talk about the nonclinical environment, and there’s a few things to balance here. We have to balance safety, we have to think about safety. We have to create a milieu of psychological safety and inclusivity.
We have to have a learner who feels safe to ask questions, to admit that they don’t understand something, or that they’re confused to share ideas and then make mistakes, right, without fear of being judged. And this welcomes diversity and perspectives and encourages collaborative learning and is just great, great all around.
So we wanna create an environment of psychological safety. Next, we wanna create a structure. Now we wanna have a clear structure, but one that has flexibility for autonomy. So in the nonclinical learning environment, we wanna set up really clear and defined objectives and expectations and kind of like, I dunno, a scaffolding, if you will, for what we’re gonna be doing.
We wanna have that structure, but without rigidity, we wanna have enough autonomy for the students to explore their interests. They’re self-directed learning and allow them to be creative, to do some creative problem solving. And this sort of balance here really improves the motivation and the ownership of the learning, which we all know is super important for adult learners.
And then we have to have the application, right? We all know, again, for adult learners. We and our students do best when they do, when they apply. So the ideal environment. It prioritizes hands-on practice and experience simulation space, repetition, and ideally opportunities for self-reflection as well, right?
If we think of Kolb’s learning Cycle, we have a defined experience. We’re gonna digest that experience. We’re gonna experiment with it, and having that time for that is really important. So if you’re teaching procedures or teaching a skill as an example, having. Rather than having an hour and a half for suture workshops, having three 30 minute sessions allows for that time in between for the adult learner to do some of that self-reflection and then come back with some ideas for experimentation and improvement.
Creating context around this teaching in the nonclinical environment. Also super important for the adult learner. Then finally, of course, we have to do feedback, right? We want regular, specific and actionable feedback for our learners, which helps them to sort of calibrate their performance and then build their own sort of professional identity and how they’re doing in the procedure itself.
So with that in mind, for our nonclinical, uh, environment and creating a, an environment for learning, now let’s start talking about some of the frameworks that we can use to build out our procedural education. The first thing to know, you know, this is from the A Bur guess article, which is in the show notes.
These are sort of the three areas or components that come into skill competency, and I include this just because it’s not necessarily what I would intrinsically think. They note that there has to be knowledge, obviously, we recognize they need to know the indications and contraindications and materials and complications that might happen.
Then they include importantly, communication. So the learner has to be able to communicate effectively with the patient, with the nurse, with ourselves. They have to be able to get informed consent, and then they have to make sure that they maintain the patient’s comfort and dignity when they’re doing the procedure.
And then finally, the big one, the one that we’re gonna focus a lot on here, is the performance of the skill. They need to be able to execute the skill and show the dexterity to do so. With these three ideas in mind, let’s start talking about some of the frameworks that are out there in medical education literature.
So the first one is, uh, by Peyton. And this was an article published in 1999, sorry, 1998. And it is the four steps. So for this, we have demonstration. In demonstration. We, the preceptor, go through and run through the procedure, start to finish at normal pace. With minimal or no talking, we basically demonstrate how the procedure is done properly.
Then we have deconstruction. In this one, the, the, uh, preceptor performs the procedure again, this time breaking it down into smaller, more manageable steps and explaining the steps as they go through. Then we have comprehension. This is where the student verbally explains the procedure and walks through the steps, demonstrating their understanding of these steps.
This is sometimes called reconstruction or rebuilding it, but on the learner’s behalf. And then finally, there’s execution or performance. The student performs the skill either with direct supervision or independently while we observe them and provide feedback for them. So that’s Peyton in the four steps.
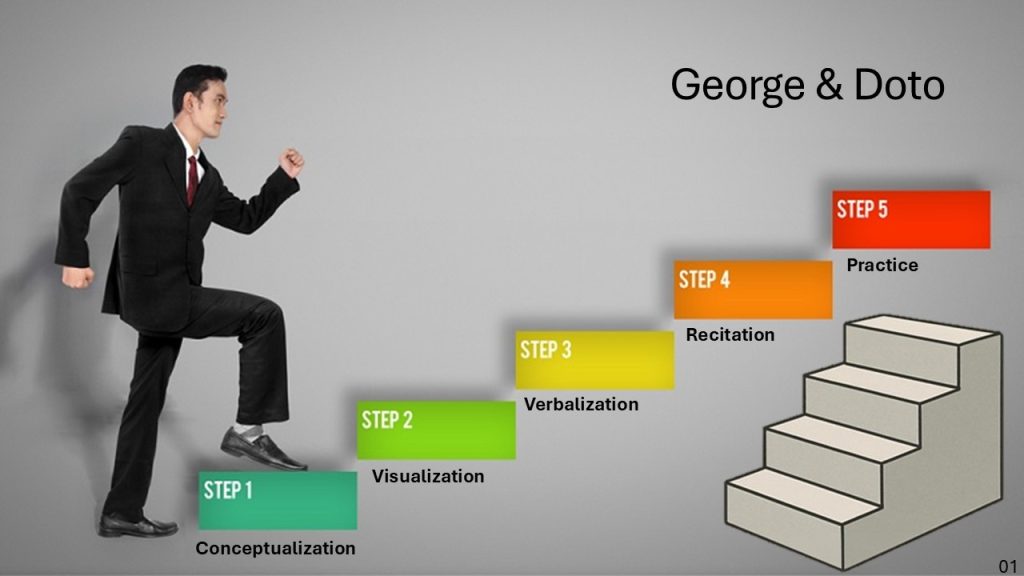
Then we have George and Doto, who in 2001 went, uh, you know, spinal tap level went from four steps to five. And these are interesting, similar, but we’ll talk about it. So step one here, they added this idea of conceptualization. This is where the learner basically learns the how and the why and the materials, the sort of pre-learning or building a foundation for the procedure itself.
Then there’s visualization where they are seeing it being done by us. And then verbalization, where we, as the preceptor hear, describe the steps as we do it in a broken down fashion, much like the Peyton Way, and then the learners’ recitation. So they’re describing the steps in detail to us, and then they get to practice or perform it.
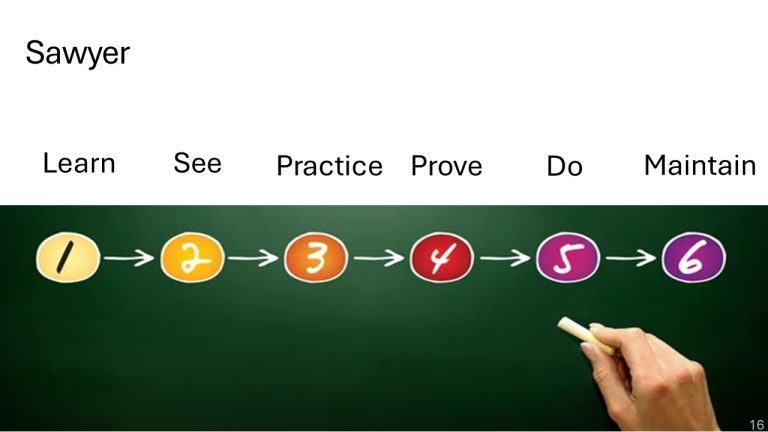
So it’s interesting that this article was published. If you kind of compare and contrast this in Peyton, basically what they added here was the conceptualization. Otherwise visualization, verbalization, recitation, and practice are the same as what Peyton outlined. Then we have Sawyer. Sawyer in 2016 said Four steps isn’t good enough.
Five steps isn’t good enough. I want six. We need six steps for this. So step one from Sawyer is to learn the learner. The student gets the foundational knowledge for the procedure. Basically through study, watching videos, reading articles, seeing stepwise breakdowns of the procedure. Then they see it. So the, uh, learner sees us perform the procedure by us, the expert in a step-by-step demonstration.
So this is a little different for Sawyer. They don’t have the like. Do it without talking and then break it down. They just say, see. So you can do it in either way. Um, but going through it from start to finish, either quietly first and then broken down, they wanna see the step-by-step processes. Then practice.
So the learner gets to practice the skill in a safe environment. This is often on a task trainer or a simulated environment with us, uh, ourselves or our partner. And we are trying to give formative feedback from a, uh, to the student, from us, the instructor. So they practice the procedure in a safe space where we can give them feedback.
So after practice comes proved. So after that, they show that they have competency in the skill by performing it again in an evaluative way. So this is with a simulated patient or with a task trainer, they are proving that they can do the steps. And that basically is done before they do, before. They are allowed in many ways to do the procedure on a patient with direct supervision.
So their autonomy is increasing here and they’re moving more toward that entrustment threshold. And finally, again, Sawyer Lovett, the maintain, recognizing that learners need to maintain their skills through clinical practice space, repetition. Whether you think of it in four or five or six steps, they have very similar, uh, elements to them about how we should be teaching these procedures to learners.
So moving from the non-clinical learning environment to the clinical one, this is a big step, right? The. Student, especially if we’re thinking about medical students, they’re now performing the procedure in the clinical environment with people throwing shade like these, you know, clinicians here with their very skeptical faces.
There’s definitely a change in the, uh, ante. There’s like a higher level to this. There’s definitely gonna be more stress when we come back to McCluskey, you know, load and power. So we have to focus on the learning environment and the clinical learning environment. Pay very careful attention to the idea that.
This is a higher stress situation. So what do we do to make this as ideal for the learner as possible? I like to think of just before, during, and after. Keep it simple. Break it down that way. So in the before, we should do a quick learner self-assessment. Have you ever done this procedure before? What parts of this have you done?
What has gone well? What has gone poorly? Then we’re gonna agree on the level of supervision. I am going to step in if X, Y, or Z happens, I’m gonna step in. If you fail to cannulate the jugular vein three times. I also like to just at least set up the idea of sort of safe words or phrases that can be used on either side to show a need for intervention from the uh, preceptor.
This can be, you know, something like, I’m gonna say, let me take the lead for a moment, or. Something along those lines. If I may and I touch your hand, that means I’m gonna guide you in a more appropriate direction. So my safe word is gonna be, let me take the lead for a moment. If you would like me to intervene or step in for you, you can simply ask a question or say something like, I’d appreciate some guidance on X, Y, or Z.
What’s your next preferred move here? So in giving the learners an out, giving them the opportunity to communicate, a desire for us to be engaged, involved, or physically hands-on without revealing themselves to the patient or whomever else is in the room is a nice thing to set up before you enter the room.
So what do we do during, so of course we’re gonna maintain calm, we’re gonna have some anticipatory cues. So set them up and be ready for the next step for them, if at all possible. We wanna use hands off guidance rather than taking the ultrasound probe. We want to verbally instruct them and guide them through the micro motions to get that parasternal long axis view.
And then we’re gonna provide real time adjustments, micro motion changes. Trying to be conscious of or avoid overloading the learner during this time. And then finally, after, after procedure, we’re gonna do a short debrief. We’re gonna reinforce the things that they did well, and then ideally we identify one or two focus areas for them to, you know, change or improve upon.
Next time you might say, Jason, this is all good. This is all well and good, but sometimes. The acuity’s there. Sometimes the, the stress is high. You know, this very sick gentleman who heart rate of 40 being bagged is rolling down and we have to do just a real time procedure. We don’t have time to set all those things up and make the milieu nice and all those things.
So how do we instruct through procedures in that type of clinical context? Well, we have to have a plan. So we wanna have a structure for what I call just sort of ad hoc bedside procedures. Ones where you can’t. Set things up, talk things through, set up, safe words, all that stuff I already mentioned. And there’s a few different ways you can do this, few different structures.
One I like is prepare, perform perfect. So in this prepare, we’re gonna briefly review the procedure, the anatomy, the steps, and then say them, you know, we’re gonna set some expectations. You’re gonna talk through this, you’re gonna say the step, and then you’ll perform it. And then of course we wanna confirm that you know, the patient’s set up right and we have the right equipment.
So that’s prepare, perform the. Student performs the procedure and they verbalize the steps as they do them. And you give, you know, guidance in micro corrections, things like, yeah, perfect Angle your needle tip just a little bit slower. Advance slowly find your needle tip. And you know, we wanna try to keep our commentary short and concise here and then Perfect.
You know, we wanna do immediate feedback, giving them one thing that they did well at least, and then one or two things that they can improve upon. Another structure for this is just the C one. Speak one. Do one. In this way, the instructor is just going to perform or demonstrate the procedures, at least the key maneuvers with, you know, two to three really, uh, clinically critical steps.
We’re gonna walk through it very quickly for them, and then the learner actually goes through and speaks it aloud. They speak the sequence back to us in their own words, giving us the opportunity to, you know, correct some misconceptions before they actually go in and do it on the patient, and then do one.
The, uh, student performs the procedure with graded autonomy depending on how they’re doing. So that’s C one, speak one, do one. And then the last here is the demonstrate guide. Observe, correct. This is a process you can do more. So when you have iterative exposures with a learner. So if you’re teaching a new PA how to do an ultrasound guided IV and you know you’re gonna do it several times, this is a great structure for that.
So demonstrate, show the student exactly how the procedure should be done. That’s pretty simple guide. Then we’re gonna have the student perform this procedure with our real time coaching. So you’re gonna do that procedure. Then observe next time we’re gonna let the student do the procedure more independently with me, simply watching.
And of course correct. We’re gonna give actionable feedback based on the observations we had. So demonstrate, guide them through the first 1, 2, 3, depending on the procedure. Then we observe them and then we, you know, of course, correct or give feedback. Always, always, always. So this is where. You know, I call this slide the Sure.
But why, sorry. Sure. But how this is where, you know, I like to take medical education literature that I read, and I just like to take it and make it really applicable. Sometimes these ideas of like the four steps, the five steps, how to do feedback, those types of things are great in theory, but how do we actually, brass tacks do these things in real life?
Well, the first thing to recognize is that you don’t need to reinvent the wheel. Right. All of the procedures that we are gonna be teaching have been thought about, constructed, deconstructed, reconstructed time and time again. And so we can take checklists and steps and other processes that are out there and we’re gonna break them down and group them into digestible groupings like we see here for airway management.
And then I also like to take. Any procedure that we’re doing and think about macro, high level, big skills and micro skills and really target and hit these, uh, for the procedure itself. And then coming into this general idea of practicing and doing a procedure, right? Or Well, yeah. I don’t think Vince Lombardi knew he was describing deliberate practice when he said perfect.
Uh, sorry. Practice does not make perfect. Only perfect practice makes perfect, but. That is exactly what deliberate practice is. It is focused, purposeful, and systematic in its approach, and it’s really goal directed and feedback driven. You know, rather than do a central line 15 times again and again and again, let’s do a central line with the first five times we.
Absolutely optimizing patient positioning and the setup of our procedural field. The next five times we’re gonna really focus on our syringe manipulation and needle tip management. And the last five times we’re gonna really, really nail, uh, getting our guide wire in and not kinking the wire. So again, goal directed, observed, and feedback driven.
And when we do repetitions, we do them with specific goals in mind. And keep in mind that feedback is gonna be targeting. Technique, not just outcome, right? So if you have a beautifully plump ij, you get the IJ in, great. We’re not gonna get feedback. Good job. You got that IJ we’re gonna have. Targeting on technique, you fumbled a little bit in your equipment.
Trying to have it outlined more succinctly. It’s gonna make that procedure easier when the patient’s anatomy is harder. Alright, and then assessment. So how do we complete assessment of these, of these learners who are doing these procedures?
So how are we going to assess the learners in these procedures? Well, I actually like to think of assessment with milestones and very specific markers. Really our goal collectively is that A, our goal for education is that a student or clinician is able to practice medicine independent of supervision.
And if we have that milestone in mind, it may gives us a better true north when we’re assessing these procedural skills. Now, this is Miller’s pyramid, which I appreciate. It kind of breaks down procedural competence into different tiers, right? I understand the procedure, I know how to do it. I can show you how to do it, and then I can do it on a real patient, right?
I get it. I know how to do it. I can show you in a trainer. I could show you in a real patient without complications. So baseline level, all the way through execution. Interestingly on this, on this Miller’s pyramid, they have competence here at the knows how and performance here. I don’t understand that at all.
Personally. I think competence and performance are the same, right? Being able to perform the procedure is being competent at the procedure. So for me, that is does, that is the goal. That’s our milestone for when we’re doing these assessments. And you know, recognize again that the same frameworks that we used to create our teaching structure and scaffolding for this can also very likely be used for assessment as we saw here, again, with our airway management algorithm.
And then finally, finally, we have to talk about feedback, right? Feedback. On a procedure ha really should require a structure because it’s very hard to do it, uh, well every time. And there’s so many, there’s so many different ways to structure your feedback. It’s almost nauseating. But I have a few here, which I think are helpful, one of which is strength, question, suggestion.
So as you might imagine strength, you’re gonna outline one specific thing that you think the learner did really well. The question is then we’re gonna ask the learner to identify what they think went well and more specifically what they think could be improved upon. And then suggestion, we’re gonna offer one to two specific behavior focused ways for them to improve for next time.
Then the next, oop, excuse me. The next is ask, tell, and ask. So asking, we’re gonna ask the learner how they think the procedure went. Tell, we’re gonna give them one positive, one reinforcing point and one improvement point. So the tell plus minus. And then we’re gonna ask the learner to restate what they think the next steps might be or how they’re going to improve for their next try.
And the third way to give at least, uh, formative feedback is the arch style. So this is, uh, ask asking the learner for self-assessment. Then we’re going to reinforce the things that they did well. We are gonna confirm areas needing correction, and then we’re gonna help the learner develop an improvement plan.
So ask, reinforce, confirm, and help. And then if you’re giving summative feedback, another nice structure for that is Prime Plus. So Prime Plus is an acronym, is actually rhyme initially, and they added the p. P is professionalism. I think for procedures it’s like are they attentive to patient safety, patient comfort?
Are they explaining the procedure thoroughly? Are they, you know. Approachable and able to work with the, uh, with the patient who’s having the procedure performed on them, as well as their interaction with us during the procedural execution. And then the RIME is actually different levels that you graduate through.
So the first is reporter, which basically you can re reiterate what is being said. Investigator is someone that can manipulate the information manager. I can do these things and then educator, I can teach others to do it. And the plus is of course, for next steps. What are we gonna do to move ourselves from that reporter, investigator, manager, educator?
So. All of these structures can be used, just find one that works well for you. Collectively, when I’m teaching, I use a lot of keep, stop start, which also can be used here. It’s similar to strengths, uh, question, suggestion, uh, but as long as you have a structure and framework, using that routinely is gonna help make the feedback much, much better.
All right, so again, teaching procedures is a unique skill. It is something that we do intrinsically so often in medicine. And again, even if you’re not in academic medicine, you’re teaching people how to do things all the time. Teaching a new tech how to apply a thumb spike, a split, as I mentioned, teaching our apps how to do ultrasound guided IVs.
There’s a lot of tactile skills that we teach all the time. So take some of the show notes from this podcast and think about how you’re gonna approach the education of your friends, colleagues, students, learners, and even yourself as you move forward through procedural competency in emergency medicine.
Alright guys, thank you so much for listening. Until next time.
Keeping your skills up in rare procedures is a battle you don’t have to fight alone. Let SimKit do all the heavy lifting with simulation training that delivers to your door once a month. Use coupon code SimKit10 for 10% off
The Complexity of Teaching Procedures
Teaching medical procedures goes beyond imparting knowledge; it encompasses psychomotor skills, decision-making, and real-time feedback. We have to recognize the challenges posed by the high stakes of patient safety and the variability in learners’ experiences and skills.
Key Takeaway: Understanding the complexity and stakes involved in teaching procedures is vital for ensuring effective learning and maintaining patient safety.
Learning Phases and Educational Theories
For teaching procedures, there are several educational stages and theories related to learning mechanical skills. He introduces the cognitive, associative, autonomous, and maintenance stages, emphasizing the need to revisit skills regularly. The theory of load versus power by McCluskey is also explored, underscoring the importance of timing in procedural education.
Key Takeaway: Recognizing the stages of skill acquisition and the balance between load and power helps in timing educational interventions effectively.
Setting the Non-Clinical Learning Environment
Creating a supportive and structured learning environment is essential in non-clinical settings. We have to remember the importance of psychological safety, clear objectives, flexibility, hands-on practice, and feedback for adult learners.
Key Takeaway: A safe, structured, and flexible learning environment enhances motivation and ownership, fostering better learning outcomes among adult learners.
Frameworks for Procedural Education
In the Medical Education literature, there are various educational frameworks, including those by Peyton, George and Doto, and Sawyer. They range in steps from 4 to 6. The ones by George & Doto and Sawyer are shown below. Each of these structures provides a structured approach for teaching procedures, emphasizing knowledge, communication, and performance.
Key Takeaway: Adopting structured frameworks in procedural education facilitates systematic learning and skill competence.
Navigating Clinical and High-Stress Environments
Transitioning from non-clinical to clinical learning settings introduces higher stress levels. Before teaching in the clinical environment, we should have practical strategies for teaching under pressure and emphasize the importance of structured ad hoc procedures for high-acuity scenarios. Step up here can be thought of in a Before, During , and After approach:
A. Before the Procedure
Quick learner self-assessment: “Which parts have you done before?”
Agree on supervision level: “I’ll step in if X happens.” Create safe words for you and the learner: you: “let’s pause” or “let me take the lead for a moment” learner: “I’d appreciate your guidance…” or “what’s your preferred next move?”
Simplify the environment (equipment setup, noise, roles)
B. During the Procedure
Maintain calm, brief, anticipatory cues
Use hands-off guidance until safety risk arises
Provide real-time adjustments without overloading the learner
C. After the Procedure
Short debrief
Reinforce what was done well
Identify one or two focused areas for next time
Key Takeaway: Effective procedural teaching in clinical settings requires adaptability, clear communication, and preparedness for high-stress environments.
Feedback
Conclusion
Teaching procedures is an intrinsic part of medical practice that requires careful consideration and structured approaches. By drawing on educational theories and frameworks, medical educators can enhance procedural competence in their learners, ultimately contributing to better patient outcomes. As Even if you’re not in academic medicine, you’re constantly teaching- making procedural education an invaluable skill in the medical community.
Incorporate these insights to refine your teaching methods and support the development of procedural skills in your colleagues, learners, and yourself.
Providing quality, actionable feedback after a procedure is vital. Having a framework for delivering such feedback makes sure we do it right when stakes and emotions are high. There are several frameworks we can use, just pick your favorite and stick with it 🙂
Strength, Question, Suggestion
Step 1 — Strength: State one specific thing the student did well.
Step 2 — Question: Ask the learner to identify what they think could be improved.
Step 3 — Suggestion: Offer one or two specific, behavior-focused ways to improve.
Ask, Tell +/-, Ask
Step 1 — Ask (Elicit)- Ask the learner how they think the procedure went.
Step 2 — Tell- Give one reinforcing point and one improvement point.
Step 3 — Ask (Plan)- Ask the learner to restate the next step or improvement they’ll try.
ARCH
Allow/ask for self assessment, Reinforce things done well, Confirm areas needing correction, Help learner with improvement plan.
Key Takeaway: Implement a framework for giving valuable feedback to the learner after the procedure.
References
- Green P, Edwards EJ, Tower M. Core procedural skills competencies and the maintenance of procedural skills for medical students: a Delphi study. BMC Med Educ. 2022 Apr 9;22(1):259. doi: 10.1186/s12909-022-03323-9. PMID: 35397566; PMCID: PMC8994896. [pubmed]
- George JH, Doto FX. A simple five-step method for teaching clinical skills. Fam Med. 2001 Sep;33(8):577-8. PMID: 11573712. [pubmed]
- Touchie C, Humphrey-Murto S, Varpio L. Teaching and assessing procedural skills: a qualitative study. BMC Med Educ. 2013 May 14;13:69. doi: 10.1186/1472-6920-13-69. PMID: 23672617; PMCID: PMC3658931. [pubmed]
- Taraporewalla K, Barach P, van Zundert A. Teaching Medical Procedural Skills for Performance. Clin Pract. 2024 May 16;14(3):862-869. doi: 10.3390/clinpract14030067. PMID: 38804399; PMCID: PMC11130924. [pubmed]
- Burgess A, van Diggele C, Roberts C, Mellis C. Tips for teaching procedural skills. BMC Med Educ. 2020 Dec 3;20(Suppl 2):458. doi: 10.1186/s12909-020-02284-1. PMID: 33272273; PMCID: PMC7712522. [pubmed]