

Pericardiocentesis Procedure
Welcome to the Pericardiocentesis procedure page. Here we will cover indications, contraindications, materials and steps for you to master this procedure. Let’s begin below with the procedure video.
Procedure Video
Preface
It is important to recognize that the cause of hemodynamic compromise from a pericardial effusion is not solely related to the volume of the effusion. The pericardial space can accommodate incredible volumes (liters) of fluid if accumulated slowly. Therefore, hemodynamic collapse from a pericardial effusion is related to both volume and time with which it accumulates. This page focuses on therapeutic pericardiocentesis and does not address the removal of fluid for diagnostic purposes.
A. Indications
The indication for pericardiocentesis is life threatening hemodynamic compromise (most commonly hypotension) believed to be caused by cardiac tamponade.[1][2] Cardiac tamponade is defined as compression of the heart disrupting chamber filling caused by fluid accumulation in the pericardial space.[3]
Hypotension from another cause must be ruled out. Perform a focused history and physical exam when conditions allow. Performing a rapid ultrasound for shock and hypotension [RUSH] exam can help rule out alternative causes of shock and confirm cardiac tamponade. The RUSH exam includes the following views and can be remembered by the acronym HI-MAP.
- Heart – Parasternal long and apical 4 chamber view to assess right ventricle to left ventricle size and for tamponade physiology.
- IVC – Inferior vena cava to assess collapsibility of the IVC (volume status).
- Morrisons – Abdominal views including Morrison’s pouch, splenorenal and bladder to assess for free fluid.
- Aorta – Abdominal aorta above and below the renal arteries to assess for aortic aneurysm and dissection.
- Pneumothorax – Both lungs for lung sliding to assess for pneumothorax.
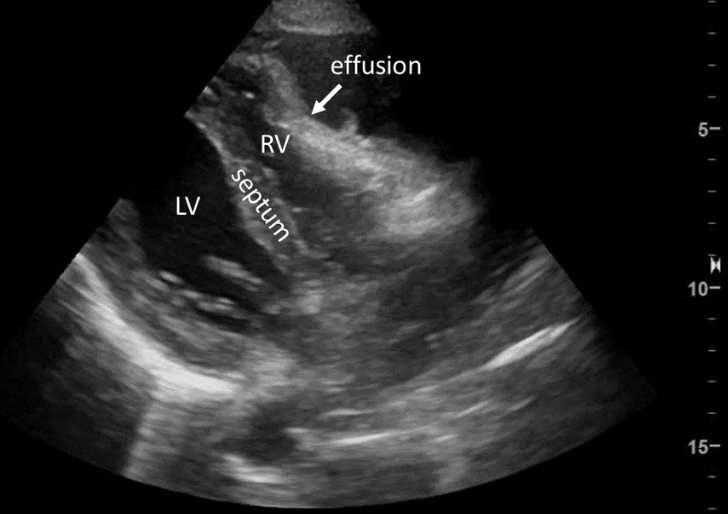
Signs of tamponade include (see US video and image below):

The above US video (Figure A) and freeze frame (Figure B) show the classic findings of tamponade, in particular right ventricular collapse during diastole (arrow). Depending on operator comfort with US, other signs can be assessed including plethoric IVC and variations of in-flow velocity.
LV-left ventricle, RV-right ventricle, arrow-outlines area of RV collapse.
B. Contraindications
No true contraindications exist for a pericardiocentesis in a hemodynamically unstable patient with tamponade. Relative contraindications include: myocardial rupture (possible in myocardial infarction), aortic dissection, alternative cause or therapy likely to be of greater benefit (thoracotomy in trauma) and coagulopathy.[2] Prosthetic heart valves, pacemakers, prior thoracoabdominal surgery, and inability to visualize the effusion are also possible contraindications.[1]
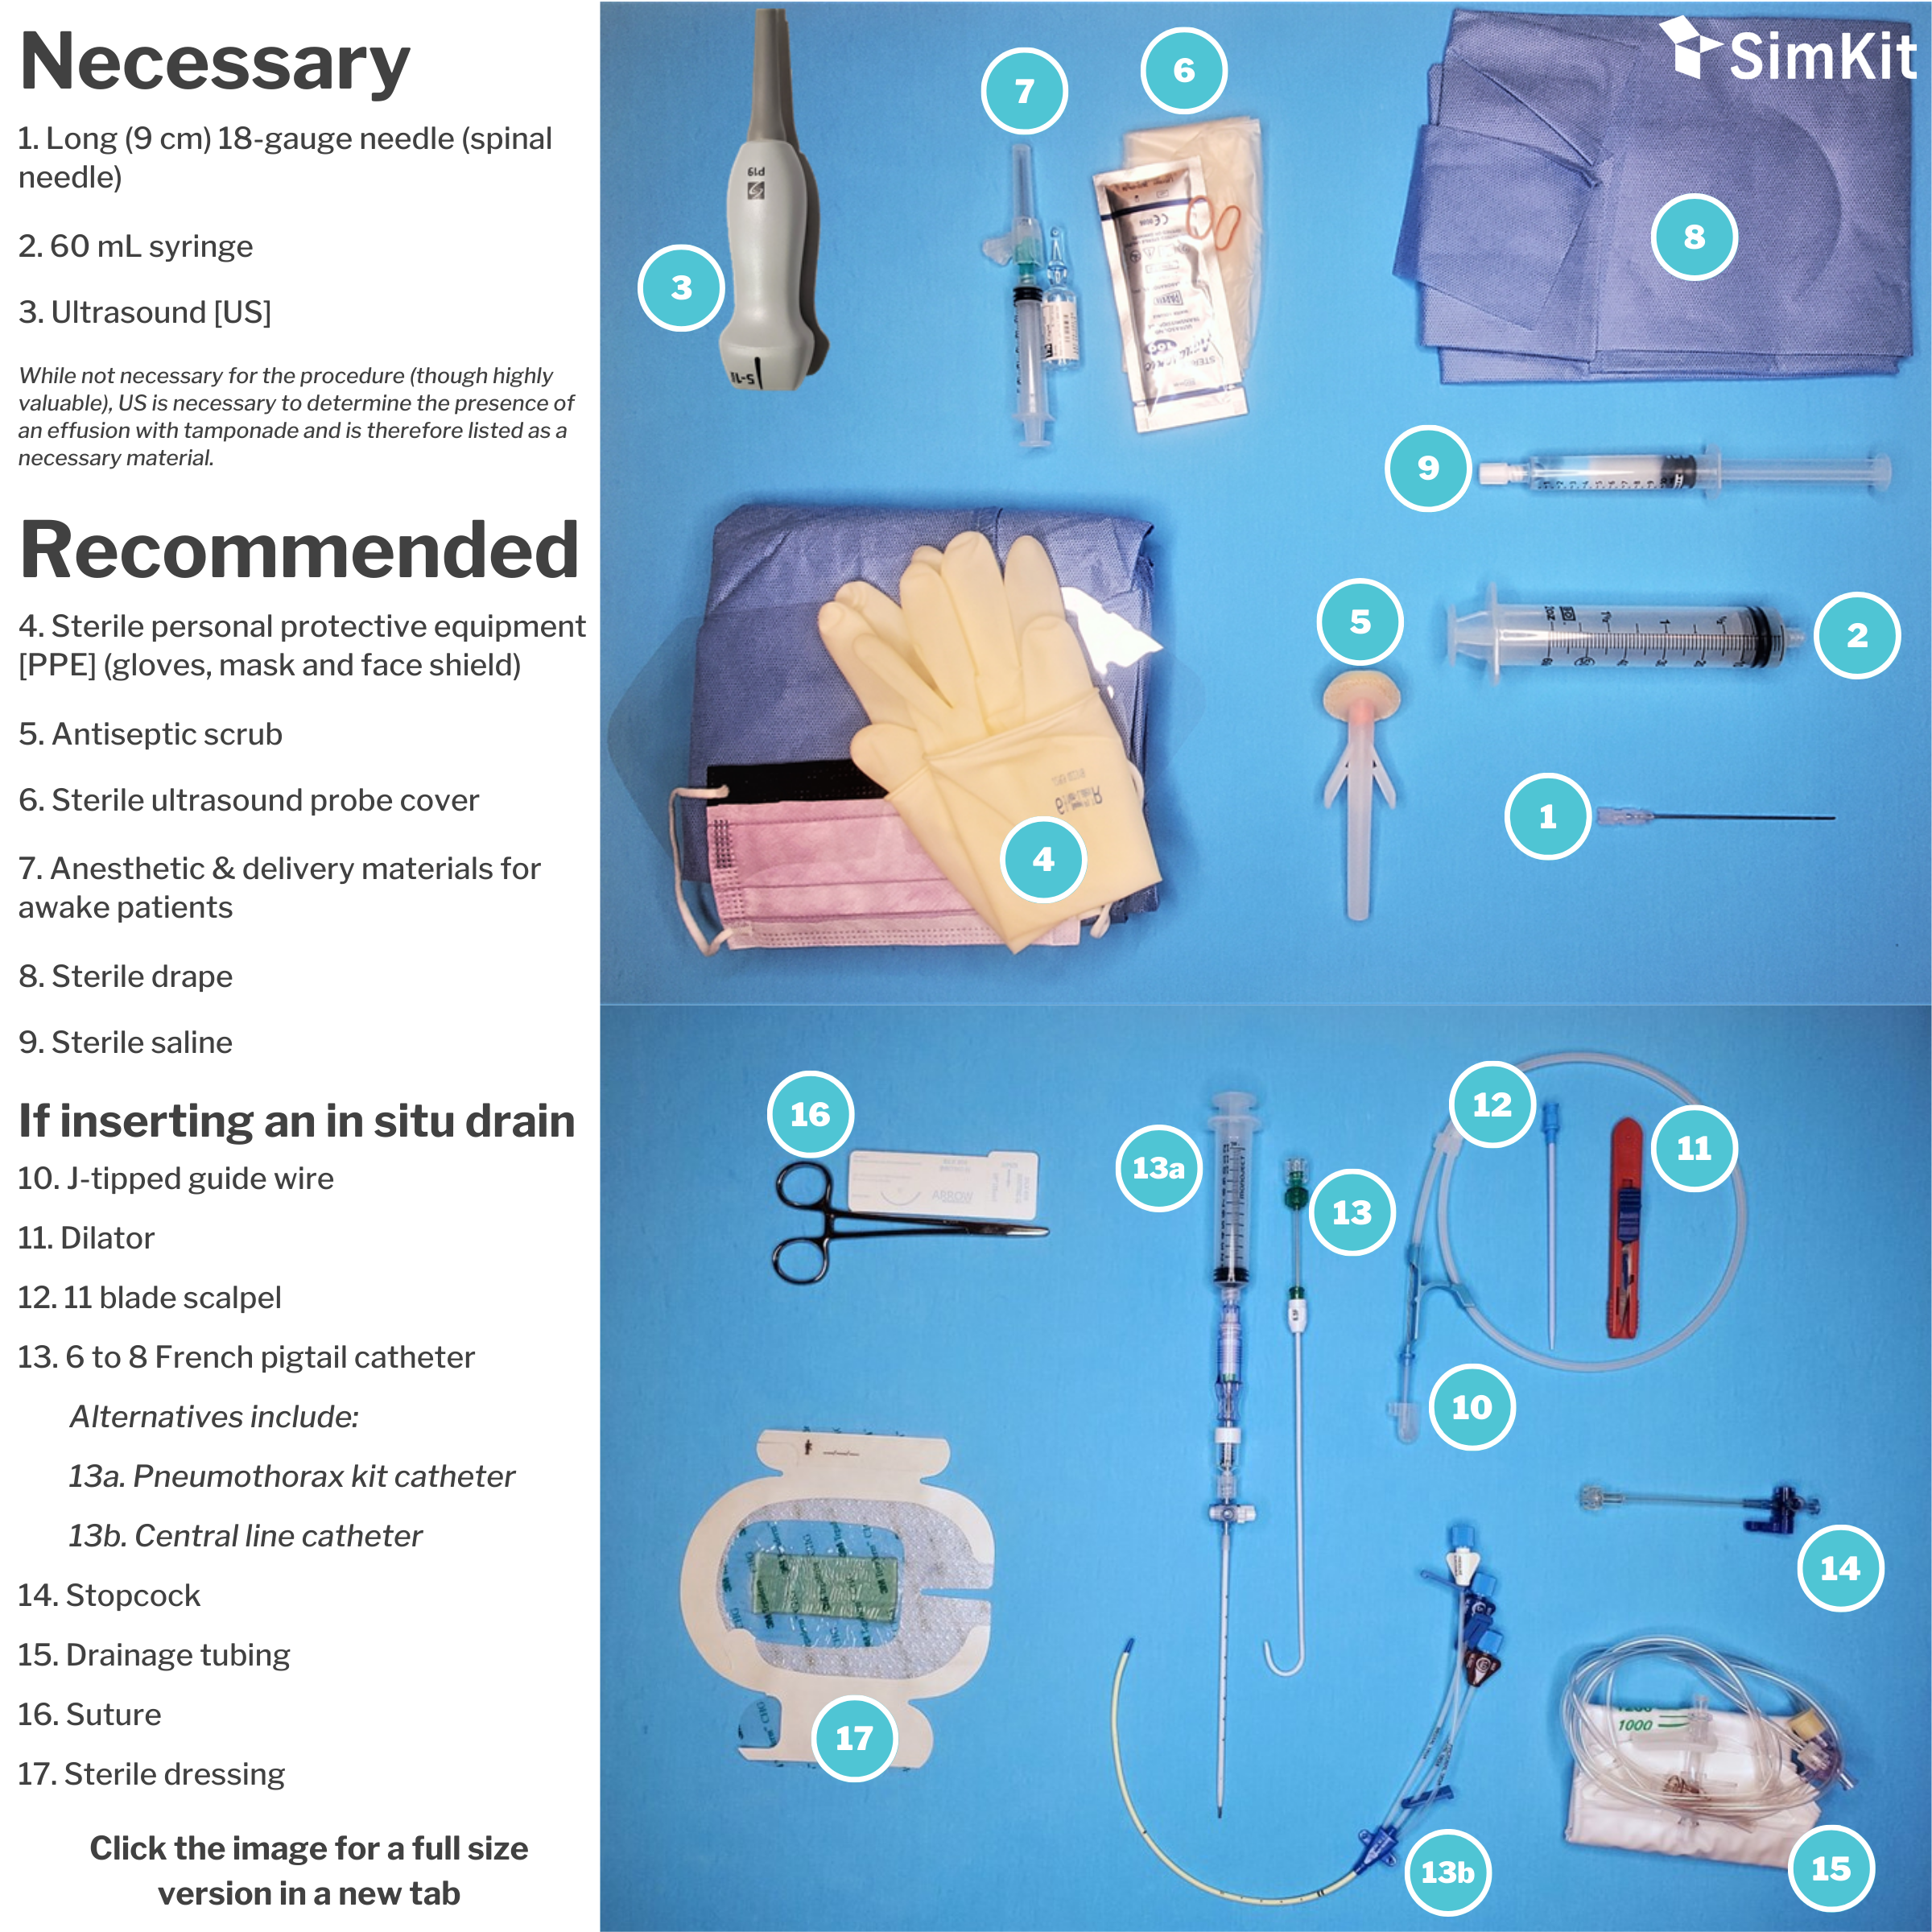
C. Materials
D. Steps
The preferred approach is US guided, followed by electrocardiographically guided, followed by blind. Given the availability of and strong preference for US guidance in the Emergency Department and Acute care settings, this approach is discussed.
Step 1 | Position patient
Place the patient in the position that best visualizes the pericardial effusion and facilitates drainage. In the blind subxiphoid approach (not recommended or discussed further), supine is acceptable. When preforming an ultrasound guided pericardiocentesis, a slight leftward roll or left lateral decubitus may facilitate clearer visualization of the pericardium on ultrasound. The apical approach is the favored approach with ultrasound guidance.[1]
Step 2 | Go sterile, anesthetize
Once the patient is ideally positioned for visualization, clean the skin with antiseptic wash (chlorhexidine), donn the necessary PPE, and apply the sterile drape or towels. Fill your 60 ml syringe with 5 mL of sterile saline and attach your 18 gauge spinal needle in preparation for use. If inserting a drain, flush the drain with sterile saline as you would if inserting a central line. If the patient is awake, anesthetize the area of needle insertion.
Note: Perform this under ultrasound guidance to practice for your needle insertion during pericardiocentesis.
Step 3 | Advance your needle
Grab your 60 ml syringe (filled with 5 ml sterile saline) and enter the skin at your anesthetized site. While applying gentle negative pressure on the plunger, advance your needle under US guidance.
Step 4 | Remove the fluid
When a return of fluid is achieved, remove as much fluid as possible. If performing a single-puncture aspiration, removal of fluid sometimes requires removing the filled 60 mL syringe and replacing it with another. When fluid can no longer be aspirated, remove the needle.
Note: Given the nature of pressure curves in the pericardium, a withdrawal of even a small amount of fluid can cause significant improvement in hemodynamics.
Step 5 | Placing a drain
If placing a drain, advance your guide wire into your 18-gauge syringe. Pay careful attention for ectopy signifying myocardial irritation from the J-tipped wire. Adjust wire insertion depth as needed. Remove the syringe, make a skin nick through the dermis with your 11 blade scalpel, and use your dilator to dilate ONLY the skin and subcutaneous tissue. Hubbing the dilator risks injury to the myocardium. Place your pigtail/catheter over the wire as you would when placing a central line. Again be conscious of ectopy and adjust as needed. Connect to your 3-way stopcock and drainage tubing and suture in place. Place a sterile dressing over the apparatus, again as you would over a central line site.
Note: When placing the drain, the catheter should be flushed with sterile saline as would be done for a central line.
References
[1] Mallamet H, Tewelde S. (2017). ‘Pericardiocentesis” in Roberts J. Roberts and Hedges’ Clinical Procedures in Emergency Medicine and Acute Care. Elsevier. Pp. 298-318.
[2] Shlamovitz G. “Pericardiocentesis.” https://emedicine.medscape.com/article/80602-overview#a2. Accessed March 2020.
[3] Mancini M. “Cardiac Tamponade.” https://medlineplus.gov/ency/article/000194.htm. Accessed March 2020.
[4] Goodman A, Perera P, Mailhot T, and Mandavia D. The role of bedside ultrasound in the diagnosis of pericardial effusion and cardiac tamponade. J Emerg Trauma Shock. 2012 Jan-Mar; 5(1): 72–75.
[5] Murphy A. “Cardiac Tamponade.” https://radiopaedia.org/articles/cardiac-tamponade?lang=us. Accessed March 2020.