Median Nerve Block
Overview
Involves local anesthesia of the median nerve to safely and reliably provide pain relief as well as total loss of feeling if needed for laceration repair, fracture reduction, or other intervention. Wrist/forearm blocks are simple to perform, essentially devoid of systemic complications and can be used in an emergency department setting, office, or operating room.
Indications
While most commonly used for finger and hand surgery, wrist blocks can also be used to perform minor procedures or to provide acute pain relief.
Contraindications
There are few true contraindications to this block. They include:
- Infection (cellulitis) at the site of injection
- Allergy to local anesthetic being used
- Patient refusal
Some relative contraindications to consider
- Patient needs a neural exam of the affected extremity.
- Anticoagulation use or bleeding disorder (pressure and tourniquet can be applied to the affected area if necessary).
- Patient with prior neural lesion or active injury
Anatomy
The median nerve traverses the carpal tunnel and innervates the skin of the lateral three-and-a-half digits (digits 1, 2, 3 and half of 4) as well as the corresponding area of the palm (Figure 1). In the forearm, it is responsible for the flexor muscles. Additionally, it commonly innervates the lateral two lumbrical muscles, as well as three thenar muscles.
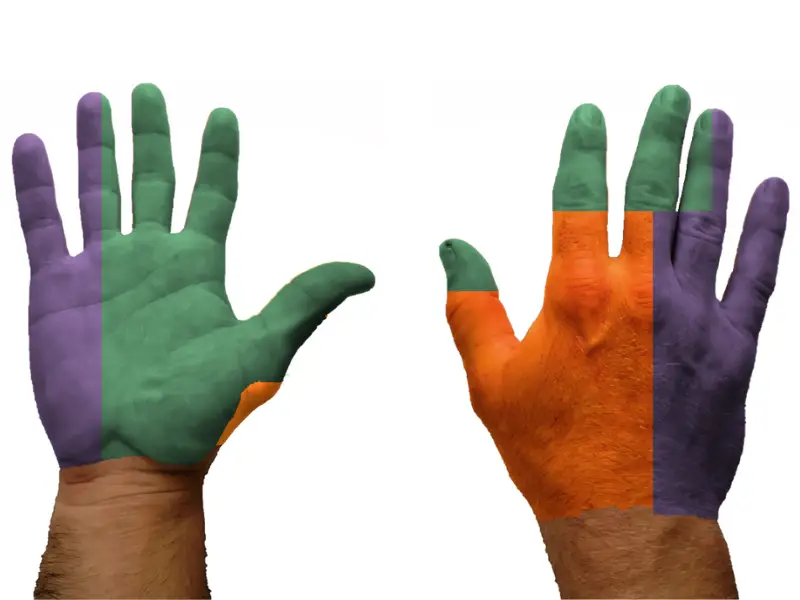
Figure 1: Palmar (left) and dorsal (right) images of the hand and associated sensory innervation. Median Nerve – Green; Ulnar Nerve – Purple; Radial Nerve – Orange. Click the image for a full size version in a new tab.
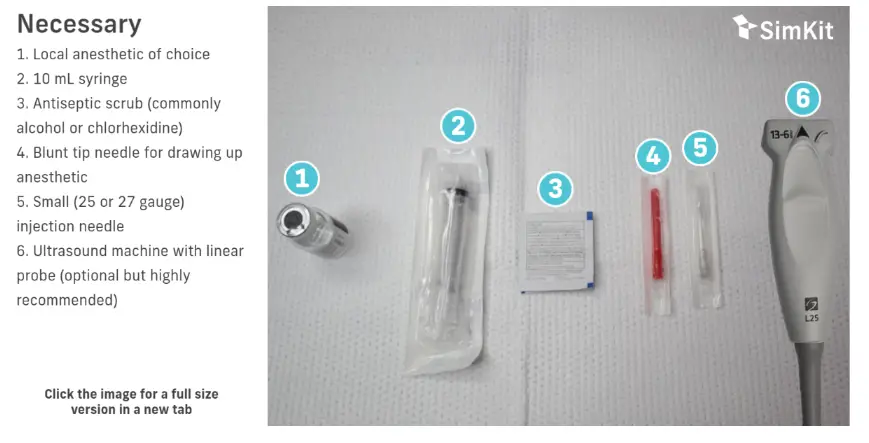
Materials

Technique
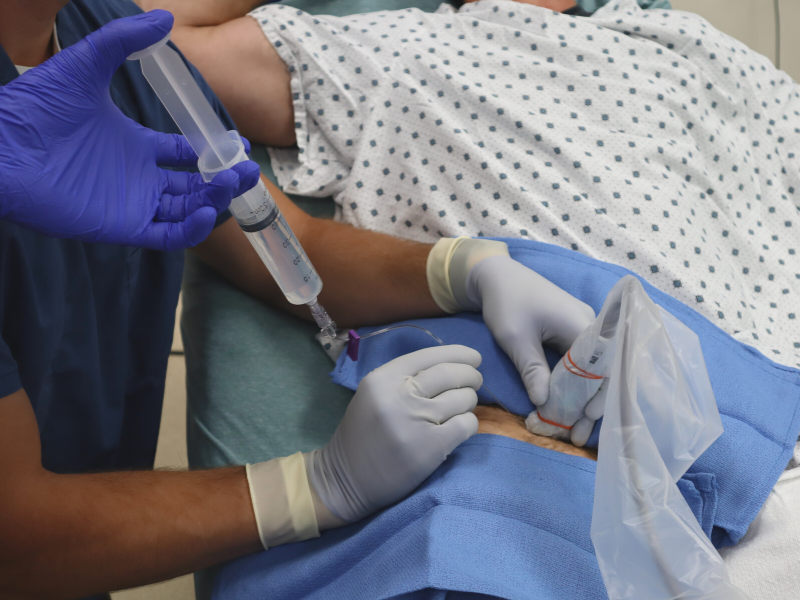
Blocks should be performed with aseptic technique using a skin antiseptic, sterile field, and sterile equipment (i.e. ultrasound) if possible. Allow appropriate dry time for your antiseptic. Block needles should be aspirated prior to every injection to avoid intravascular administration, and injection should be immediately stopped if the patient suddenly complains of pain or high pressure.
Landmark
- Place the patient’s extremity in the supinated position.
- The needle is inserted 2 cm proximally from the wrist crease, between the tendons of the palmaris longus and flexor carpi radialis (Figure 2). It should be inserted at a 45-degree angle pointing distally and reach a depth no greater than the palmaris longus tendon (approximately 2-4 mm from the surface of the skin).
- Inject 3-5 mL of local anesthetic.
Note: Some people have an anatomically missing flexor carpi radialis. If this is the case, inject the anesthetic to the radial (thumb) side of the palmaris longus.

Figure 2: The Palmaris longus and Flexor carpi radialis labeled. Asking the patient partially flex and “stiffen” the wrist and digits as depicted can make these tendons more readily visible. Click the image for a full size version in a new tab.
Ultrasound
1. Place the patient’s extremity in the supinated position (Figure 3).
2. Place the linear probe ultrasound transversely across the arm, approximately 5-10 cm proximal to the wrist crease (Figure 3). Scan up and down the forearm to identify the relevant anatomy. At this level of the arm, the tendons of the forearm should have disappeared, leaving the muscle body and the solitary median nerve in view. The median nerve will have the classic “honeycomb” echogenicity with the proper US settings (Figure 4 & 5). Starting at the palpable radial pulse (artery) and sweeping proximally is another viable option.
Note: If there is uncertainty about the target structure being a nerve or tendon, run the US probe up and down. Tendons will become muscle bodies proximally. Use doppler mode to verify the target structure is not a vessel.
3. After cleaning the area and placing a skin wheal, advance your needle in the longitudinal plane until in close proximity to, but not piercing, the median nerve. After aspirating to verify not intravascular, inject a small amount of local anesthetic which will cause some hydro-dissection and confirm appropriate localization. If necessary, reposition needle tip until local anesthetic surrounds the median nerve.
Note: Many advocate an in plane approach to needle insertion to view the entire needle, including the needle tip, through the entirety of the procedure.
4. Inject 3-5 mL of local anesthetic around the median nerve.
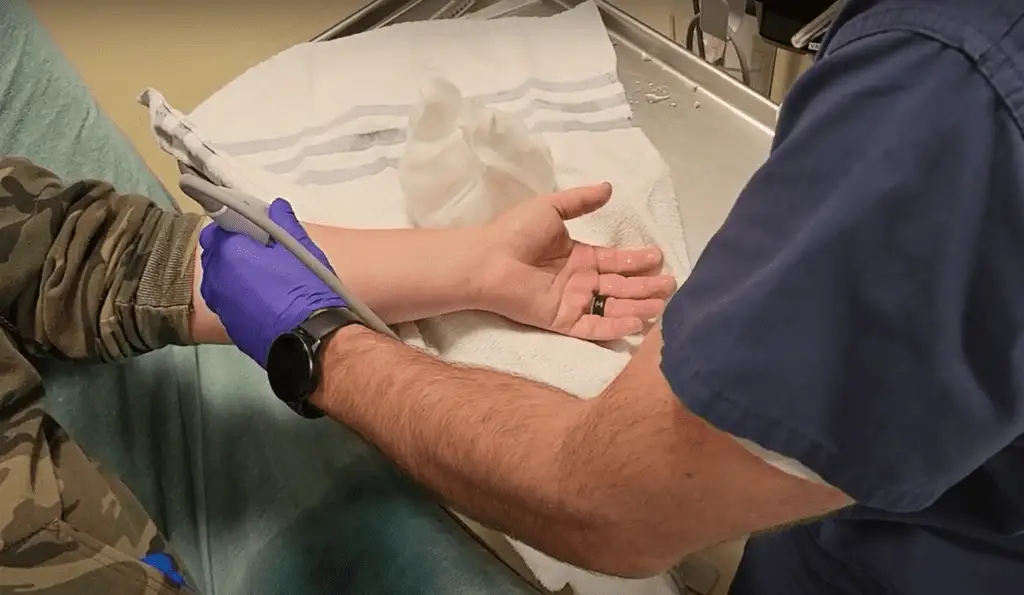
Figure 3: Patient and US probe positioning. Note good visualization of the median nerve was obtained relatively high on this patient. Click the image for a full size version in a new tab.
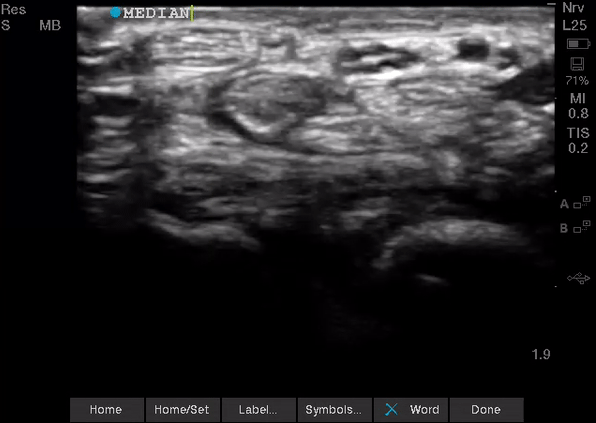
Figure 4: US sweep up the arm from the palpable radial artery to the mid-forearm. Click the animation for a full size version in a new tab.
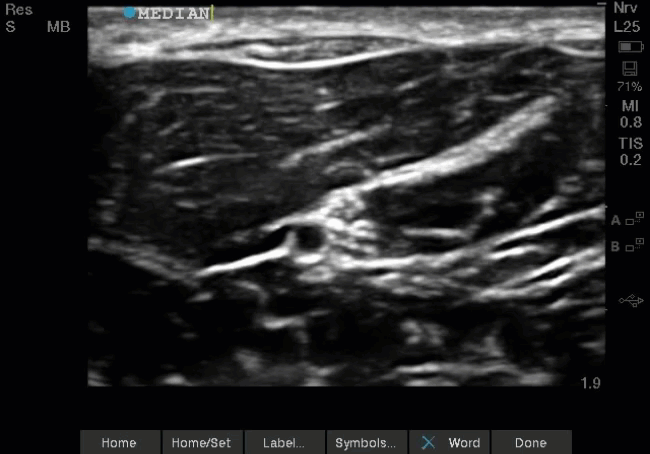
Figure 5: US of the median nerve next to the median artery. See animation for anatomy overlay. Click the animation for a full size version in a new tab.
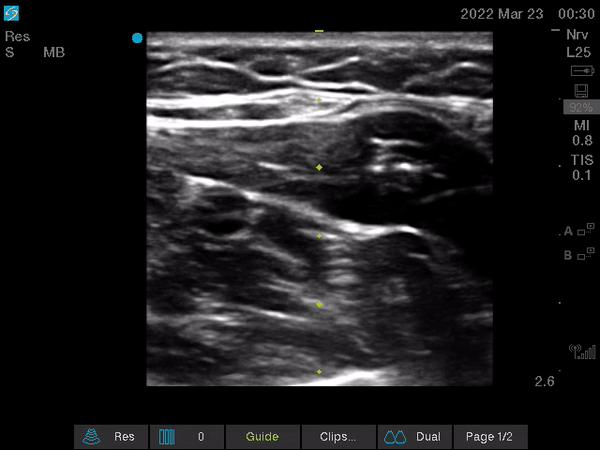
Figure 6: US image of local anesthetic being instilled around the median nerve in the longitudinal plane on US. Click the animation for a full size version in a new tab.
Summary & Bullet Points
Median Nerve Block
Overview
Indications
While most commonly used for finger and hand surgery, wrist blocks can also be used to perform minor procedures or to provide acute pain relief.
There are few true contraindications to this block. They include:
- Infection (cellulitis) at the site of injection
- Allergy to local anesthetic being used
- Patient refusal
Some relative contraindications to consider are:
- Patient needs a neural exam of the affected digit
- Anticoagulation use or bleeding disorder (pressure and tourniquet can be applied to the affected area if necessary)
- Patient with prior neural lesion or active injury
Anatomy
Materials
Technique
Landmark
Place the patient’s extremity in the supinated position.
The needle is inserted 2 cm proximally from the wrist crease, between the tendons of the palmaris longus and flexor carpi radialis (Figure 2). It should be inserted at a 45-degree angle pointing distally and reach a depth no greater than the palmaris longus tendon (approximately 2-4 mm from the surface of the skin).
Inject 3-5 mL of local anesthetic.
Ultrasound
Place the patient’s extremity in the supinated position (Figure 3).
Place the linear probe ultrasound transversely across the arm, approximately 5-10 cm proximal to the wrist crease (Figure 3). Scan up and down the forearm to identify the relevant anatomy. At this level of the arm, the tendons of the forearm should have disappeared, leaving the muscle body and the solitary median nerve in view. The median nerve will have the classic "honeycomb" echogenicity with the proper US settings (Figure 4 & 5). Starting at the palpable radial pulse (artery) and sweeping proximally is another viable option.
After cleaning the area and placing a skin wheal, advance your needle in the longitudinal plane until in close proximity to, but not piercing, the median nerve. After aspirating to verify not intravascular, inject a small amount of local anesthetic which will cause some hydro-dissection and confirm appropriate localization. If necessary, reposition needle tip until local anesthetic surrounds the median nerve.
Inject 3-5 mL of local anesthetic around the median nerve.
References
-
- Median nerve block is safe and effective way to provide analgesia/anesthesia to a patient requiring intervention (ie laceration repair) in the dermatomal distribution of the medial nerve.
- Very few contraindications exist for this block (overlying infection, medication allergy).
- The median nerve can be injected blindly at the wrist crease between the palmaris longis and flexor carpi radialis, or via ultrasound in the mid-forearm.